
Getting your skates sharpened isn’t just routine maintenance. It’s one of the most overlooked ways to directly improve your control, speed, and confidence on the ice. Over the years, I’ve tested different hollows, sharpened with both pro-level machines and home setups, and learned how even a subtle adjustment in edge bite can change the way you play.
This updated guide cuts through the noise with the latest sharpening tools, techniques, and tips to help you get more out of every stride. Whether you’re sharpening your own skates, testing a new hollow, or just trying to solve that annoying slip mid-turn, we’ll cover what you need to know — step by step.
TL;DR
- Sharpen hockey skates every 15–20 hours of ice time, or sooner if you notice slipping, uneven edge grip, or dullness.
- The Radius of Hollow (ROH) determines edge behavior—3/8″ gives max bite for agility, while 5/8″ or 1″ provides more glide and speed.
- Choose your hollow based on body weight, skating style, position, and rink conditions—not just a standard recommendation.
- Use automated sharpeners like Sparx or ProSharp for consistent edge control and personalized profiling at home or in pro shops.
- Inspect blades before sharpening; clean them, check for rust or nicks, and use a honing stone afterward to smooth burrs.
- Profiling modifies the blade’s curve for agility or balance; sharpening creates the hollow for grip and glide across the blade’s width.
- Blade maintenance between sharpenings—drying, using cloth covers, and avoiding hard surfaces—extends edge performance and lifespan.
- Home sharpening is ideal for frequent skaters or families; casual players can rely on experienced pro shops for accuracy and convenience.
Understanding Skate Blades and Edges
A hockey skate blade isn’t flat — it’s concave. The sharpening process creates a “hollow” down the middle, forming two edges on either side. These are the inside and outside edges you rely on to dig into the ice for every stop, turn, and stride.

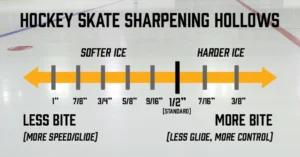
What’s critical here isn’t just how sharp the blade is, but how deep the hollow is. This depth is called the Radius of Hollow (ROH) and it’s what defines how much grip (bite) and glide your skates give you. The smaller the ROH number, the deeper the hollow — and the more bite you get.
| Hollow (Radius) | Grip/Bite | Glide | Common For |
|---|---|---|---|
| 3/8" | High | Low | Light players, quick stops/turns |
| 1/2" | Medium | Medium | Default for most skaters |
| 5/8" | Lower | Higher | Heavier players, more glide |
| 1" | Lowest | Highest | Goalies, speed skaters |
Understanding the blade’s hollow is step one — but it’s how you choose and maintain that hollow that truly changes how you perform on the ice. Next, we’ll look at how to pick the right one for your style and conditions.
Choosing the Right Hollow for Your Skates
There’s no universal best hollow only the one that fits you. The ROH you choose should match your weight, position, skating style, and even the rink conditions.
Factors That Influence Hollow Choice
- Player Weight Heavier players benefit from shallower hollows (e.g., 5/8″ or 1″) for more glide and less resistance. Lighter players may need a deeper hollow (e.g., 3/8″ or 1/2″) to dig into the ice and gain control.
- Skating Style & Position Quickcutting forwards often prefer more bite (3/8″ or 1/2″). Defensemen and goalies lean toward more glide for long strides and movement efficiency (5/8″ or 1″). Beginners often start with a 1/2″ hollow it provides a balanced mix of grip and glide.
- Ice Conditions On softer ice, use a shallower hollow to avoid digging in too deeply. On hard, fast ice, go deeper for more edge contact and traction.
The image below lists several of the more common hockey skate sharpening hollows that are often offered at skate shops.
Hockey Skate Sharpening Hollows Chart
Next, we’ll get into how to properly prep your skates before sharpening because edge consistency starts with clean, damagefree blades.
Preparing Your Skates for Sharpening
Before sharpening, your skates need a quick inspection. Dirt, rust, or damage can throw off the sharpening job entirely.
Here’s what to check:
- Clean the blades: Use a soft cloth to wipe off moisture, ice residue, and debris. Always dry your blades after skating.
- Check for rust: Look closely at the steel. Use fine grit sandpaper or a rust eraser if you notice surface rust. Avoid harsh scrubbing.
- Inspect for damage: Nicks, burrs, or uneven wear should be addressed first. If the steel is too worn down, consider replacing it.
Whether you’re using a professional-grade machine at your local rink or a home sharpener like Sparx or ProSharp, technique matters. Consistency in pressure, alignment, and finishing makes the difference between crisp edges and uneven performance.
Step-by-Step Process
- Secure the skate: Make sure the skate is level and stable in the holder. Misalignment leads to uneven hollows.
- Set the hollow: Choose your desired ROH setting based on your weight, ice conditions, and skill level.
- Pass evenly: Glide the blade across the grinding wheel using smooth, even passes. Don’t rush it. Uneven pressure creates chatter or inconsistent edges.
- Use a blade edge checker (optional): Devices like the BEAM from Sparx measure edge balance to 1/10,000th of an inch.
- Deburr and finish: Always use a honing stone after sharpening. Run it lightly along each edge to remove burrs and avoid snagging or catching on the ice.
Although we’ve covered the key steps in the skate sharpening process, I thought it would be helpful to provide a more detailed breakdown. This includes some additional considerations for each stage, the equipment you’ll need, and safety precautions to keep in mind. Below you’ll find a comprehensive guide to help you get the best results and maintain safe practices when sharpening your skates
| Step | Description | Equipment Needed | Safety Precautions |
|---|---|---|---|
| 1 | Inspect blades for rust, nicks, and wear before sharpening. | Skates, cloth, good lighting | Handle blades carefully to avoid cuts. |
| 2 | Choose your Radius of Hollow (ROH) based on position, weight, and ice conditions. | ROH knowledge, skate profile preference | Avoid extreme hollows unless necessary; test for stability. |
| 3 | Align skate in holder; ensure it’s centered and level. | Skate sharpening machine | Machine should be on a flat, stable surface. |
| 4 | Perform consistent passes with steady pressure; don’t rush. | Grinding wheel, sharpening jig | Keep hands clear of blade; wear gloves if needed. |
| 5 | Deburr both edges using a soft honing stone. | Honing stone, microfiber cloth | Use light, even pressure to avoid edge damage. |
| 6 | Use edge checkers or visual tests to confirm even sharpness. | Blade edge checker, flashlight | Visually inspect under good lighting before using. |
Alternative Skate Sharpening Methods
While automated machines and pro shop services are the gold standard for consistency, not every player has access to them or needs them every time. Here are the main options when it comes to sharpening your skates beyond the standard setup:
Handheld Sharpeners (On-the-Go Fixes)
- These tools are designed for quick touch-ups between games or practices. They won’t replace a full sharpening but can help restore edge bite if you’re in a pinch.
- Great for tournaments or outdoor rinks where shops aren’t nearby.
DIY Home Systems
- Sparx Sharpener 3: Easy-to-use at home with automated passes and built-in safety. Features the BEAM edge checker for precision.
- ProSharp Home: Advanced profiling and edge accuracy tools, ideal for players who want control over their blade feel.
- Requires a higher up-front cost but can be cost-effective long-term for frequent skaters or multi-skater families.
Professional Shop Services
- Most reliable for custom profiles, new steel, and high-precision sharpening.
- Pros know how to match sharpening to playing style, weight, and position.
- Downside: Wait times, cost, and inconsistency between shops if you’re traveling.
Next up: How to maintain sharp blades between sharpenings so you get more ice time before your next tune-up.
When it comes to enhancing your skating techniques, a sharp blade is essential. A properly maintained skate is a crucial part of your hockey equipment and can greatly affect your performance on the ice. Furthermore, choosing the right hockey skate brand can make a difference in terms of comfort and durability.
Skate Sharpening Maintenance and Tips
Your edges don’t just wear down when you skate. They also dull from moisture, poor storage, and contact with non-ice surfaces. Good sharpening habits go further when you care for your blades between sessions.
How Often Should You Sharpen?
- Recreational skaters: Every 15–20 hours of ice time.
- Competitive skaters: Every 5–10 hours.
- Elite players: Some sharpen as often as every 2–3 hours.
Let performance guide your timing. If you’re slipping during stops or turns, or can’t hold an edge during transitions, it’s probably time.
Between-Sharpening Care
- Dry your blades after every use to prevent rust.
- Use cloth blade covers (not plastic guards) for long-term storage.
- Never walk on hard surfaces without guards. Even a few steps can flatten your edge.
- Inspect your blades regularly for nicks or pitting. Small damage adds up fast.
- Store skates in a breathable bag, not sealed plastic. Trapped moisture degrades steel.
Are you curious about the differences between hockey skates and figure skates? Gain insights into these two types of skates by checking out our detailed guide on Hockey Skates vs. Figure Skates. Understand which skate is best suited for your performance on the ice.
Frequently Asked Questions About Skate Sharpening
How do I know when my skates need sharpening?
If you feel like you’re slipping during turns, struggling to stop cleanly, or losing edge grip mid-play, it’s time. You can also run your thumb nail lightly along the edge — if it slides without catching, the blade is dull.
What hollow should I use?
Start with 1/2″ if you’re unsure. Heavier players or those seeking glide may prefer 5/8″ or 1″, while lighter players or aggressive skaters might benefit from 3/8″ or 7/16″ for extra bite.
How long does sharpening last?
Recreational skaters might need sharpening every 15–20 hours of ice time. Competitive players often need it every 5–10 hours. Frequency depends on your play style, weight, and how sharp you like your edges.
Can I over-sharpen my skates?
Yes. Over-sharpening wears down the steel faster and may change your rocker or blade profile over time. Sharpen only when necessary and use even, consistent passes.
What’s the difference between profiling and sharpening?
Sharpening shapes the hollow (grip vs glide), while profiling changes the blade’s curvature to affect balance, speed, and agility. Think of profiling as shaping the blade lengthwise, sharpening as crosswise.
Is a home sharpening machine worth it?
If you or your kids skate 3+ times per week, yes. Tools like Sparx and ProSharp offer pro-level results at home and save time and long-term cost. Ideal for multi-skater households.
Should goalies use the same hollow as players?
No. Goalies often prefer flatter hollows like 1″ or 3/4″ to increase glide and stability in the crease. Player-style hollows may dig in too much.
What does “chatter” mean during a stop?
Chatter is a sign your edges may be uneven or there’s a flaw in the sharpening. Have your blades checked for balance or burrs.
Can I sharpen skates without a machine?
You can use a honing tool for minor edge restoration, but full sharpening requires a grinder to properly shape the hollow. Portable hand tools are only for emergency touch-ups.
Final thoughts
Skate sharpening might seem technical, but it’s one of the most powerful ways to fine-tune your performance. Whether you’re skating recreationally or playing competitively, how your blades interact with the ice affects every stride, stop, and turn.
Having sharpened my own skates for years, I can tell you that no two players feel edges the same way. Some like a crisp bite, others want glide and flow. The key is to experiment, observe, and track what works best for your weight, style, and ice surface.
New tech like Sparx and ProSharp has made high-quality sharpening more accessible than ever. Still, understanding the basics—blade prep, hollow selection, edge maintenance—remains essential no matter what gear you use.
Keep your blades clean, your edges even, and your sharpening consistent. It’ll save you time, extend your steel’s life, and—most importantly—elevate your confidence on the ice.
References

My name is Shane and I am a semi-pro hockey player who enjoys playing hockey more than anything else.I test and rate hockey Gear so that you can find the best gear that helps you play better.


)