
What is a Hockey Shooting pad?
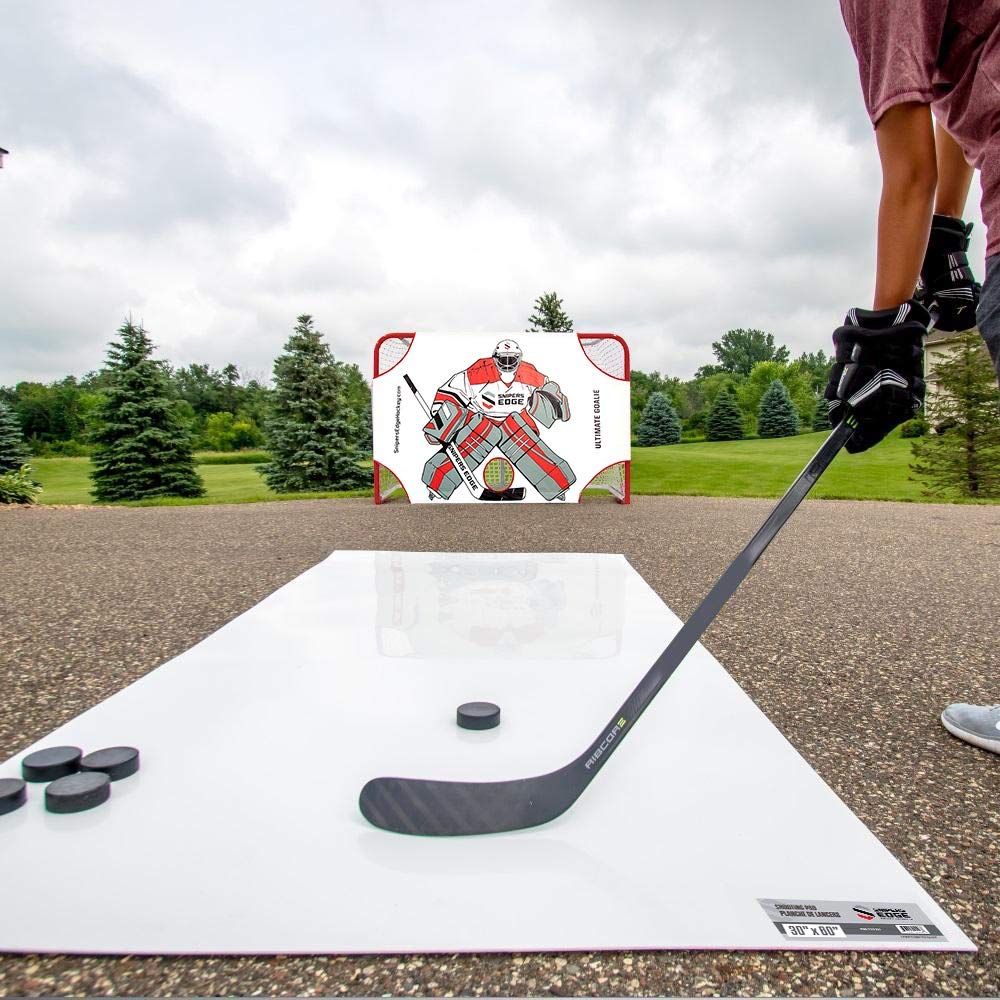
A hockey shooting pad is a flat, slick surface—typically made from high-density polyethylene (HDPE)—designed to replicate the low-friction glide of ice. It allows players to simulate realistic puck movement while protecting their stick blades from rough outdoor surfaces. Think of it as your personal slice of synthetic ice.
| Key Component | Function |
|---|---|
| High-density polyethylene | Mimics ice; ensures puck glide and surface durability |
| Rounded corners | Allows puck rebound and mimics in-game transitions |
| Handle cutouts | Enhances portability and storage convenience |
| Larger surface area | Enables complete training routines, including passing drills |
You might ask, “Why not just shoot on the garage floor or a stretch of pavement?” The answer lies in surface friction. Unlike concrete or tile, HDPE delivers a smooth and predictable glide, which is essential for building proper shooting mechanics and reaction timing. Add a quick spray of silicone lubricant or WD-40, and the puck movement becomes strikingly close to what you’d experience on ice.
Why Every Player Needs a Shooting Pad?
No matter your skill level, a shooting pad helps take your game from repetitive drills to targeted skill refinement. It’s more than a flat board—it’s a serious off-ice hockey training asset.
| Benefit | Why It Matters |
|---|---|
| Enhances shooting technique | Encourages consistent form on a reliable, slick surface |
| Improves stickhandling | Allows precise puck control in confined or dynamic drill setups |
| Enables convenient practice | Can be used in basements, garages, or backyards |
| Protects your stick blade | Reduces wear caused by abrasive or uneven training environments |
In one Reddit discussion, experienced players praised 4’x8.5′ roll-up pads for allowing full shooting motion and stickhandling space. Beginners, on the other hand, often pair smaller pads with backstop nets for containment and safety.
Scientific research backs this up: A 2022 study from the Journal of Sports Science found a measurable improvement in puck accuracy and shot release speed among players who incorporated tools like shooting pads into their off-ice regimen.
Types of Hockey Shooting Pads (and Which One You Need)
Finding the right shooting pad depends on your goals, training frequency, and budget. Here’s a breakdown of the most common options:
🥇 Professional-Grade Shooting Pads
These high-performance pads feature 1/4-inch HDPE thickness for durability and ice-like responsiveness. Designed to handle slap shots and frequent use without warping.
💸 Budget-Friendly Shooting Pads
Often 1/8-inch thick, these are ideal for stickhandling practice and quick-release drills. Lightweight and affordable, they’re great for casual or beginner players.
🎒 Portable Shooting Pads
Made for mobility, these pads include handle cutouts or roll-up capabilities. Examples like the Extreme Hockey Roll-Up Pad offer a great blend of surface slickness and transport convenience.
Beyond these fundamental categories, there are additional variations of hockey shooting pads that cater to specific needs. Let’s take a closer look at these specialized types:
| Type | Description | Best For |
|---|---|---|
| Roll-Up Pads | Flexible and thin; rolls up for transport. | Players on-the-go |
| Synthetic Ice Pads | Modular HDPE tiles simulate real ice feel. | High-skill training and transition drills |
| Dual-Sided Pads | Features different surfaces for varied drills. | Technical players seeking versatility |
| Extra-Large Shooting Pads | Oversized, durable mats for complete drills and movement. | Coaches or advanced players with space |
| Interactive Tech Pads | Track shots and puck speed digitally (e.g., HockeyShot Radar Pad). | Data-driven players |
How to Choose the Right Hockey Shooting Pad
Selecting the right hockey shooting pad isn’t just about price or size—it’s about how well it mirrors on-ice conditions and fits your training setup. If you’re aiming to replicate powerful one-timers or fine-tune stickhandling in your driveway, choosing the right pad can dramatically affect your development.
🟦 Size and Thickness
The ideal shooting pad size depends on your training goals. A larger surface (like 4’x8.5′) gives you space to work on full-range slap shots and stickhandling drills. Smaller pads (28″x42″) are more portable but limit mobility.
Thickness also matters.
-
1/8 inch: Lightweight and portable; good for beginners.
-
3/16 inch: Balanced for intermediate players.
-
1/4 inch: Pro-level durability and realism—perfect for slap shots and frequent use.
🟦 Durability and Quality
Always look for HDPE (high-density polyethylene) or silicone-coated surfaces, as recommended by Players, reddit users and industry experts. These materials offer a slick, ice-like glide and resist warping. DIY options using HDPE sheets and silicone spray can work, but commercial-grade pads often outperform in the long run.
🟦 Portability and Storage
If you’re training in multiple locations, portability is key.
Choose a pad with handle cutouts, roll-up design, or modular panels for easy transport. Roll-up shooting pads like the Extreme Hockey 4’x8.5’ model are praised for their portability and strap system.
🟦 Surface Texture and Glide
For realistic puck glide, a low-friction surface is essential. Pads with silicone-infused coatings (e.g., SKLZ Shooting Pad) or pre-treated finishes offer superior smoothness. For DIY pads, Reddit users recommend applying WD-40 or silicone spray like Pledge to enhance glide.
💡 Pro Tip: Clean your pad regularly to prevent buildup and maintain glide quality.
🟦 Budget and Value
-
Budget pads (under $30) offer a good entry point for casual players.
-
Mid-tier options ($50–$75) strike a balance between size, glide, and quality.
-
Pro-grade pads ($100+) justify the cost with thickness, weather-resistance, and longevity.
Remember, a well-maintained budget pad can outperform a poorly kept premium one. It’s all about finding the sweet spot between cost, durability, and performance.
In addition to the basic factors, there are some specialized considerations that could further influence your choice of a hockey shooting pad. Here, we delve deeper into those unique aspects and provide some recommendations for each:
| Aspect | Consideration | Recommendation |
|---|---|---|
| Customization | Some pads include markings like faceoff circles or blue lines | Ideal for players simulating in-game scenarios |
| Tech Integration | Smart pads offer shot tracking and feedback (emerging category) | Great for data-focused athletes |
| Dual-Sided Surface | Offers two textures—slick on one side, grippy on the other | Useful for varied drills or group training |
| Weather Resistance | Outdoor pads need UV and moisture protection | Choose UV-treated HDPE or silicone-coated mats for outdoor setups |
| Maintenance Needs | Some surfaces require frequent cleaning or reapplication of coating | Consider ease of cleaning based on your usage and location |
Your shooting pad is like your stick curve or your skates’ hollow—personal. The goal isn’t to find the best one on paper, but the one that fits your space, your goals, and your rhythm.”
Whether you’re a weekend warrior or chasing serious on-ice improvement, your shooting pad is more than just training gear—it’s your off-ice edge.
Best Hockey Shooting Pads: Expert Picks and Community Favorites
If you’re still on the fence about which shooting pad to buy, here’s a breakdown of some top-rated options — whether you’re a beginner or grinding through off-ice sessions like a pro. These aren’t affiliate picks or sponsored fluff — just real tools players are using, based on market data, product specs, and community reviews.
I’ve tested a few of these shooting pads myself — enough to know which ones are worth the money and which just collect dust after a week.
🥇 1. Extreme Hockey Pro Shooting Pad (28″x57″)
-
Price: $99.95 (currently unavailable)
-
Thickness: 3/16″
-
Features: Simulates real-ice glide, includes UV protection and weatherproof coating.
-
Why It Stands Out: Smooth enough for heavy slap shots, yet portable with built-in handles.
-
Best For: Intermediate to advanced players needing solid feel and surface consistency.
🧊 2. HockeyShot Shooting Pads (Various Models)
-
Price Range: $40–$120
-
Sizes: Junior to Pro (24″ x 48″ to 30″ x 60″)
-
Features: Weather-resistant HDPE surface, supports passing, stickhandling, and shooting.
-
Why Players Like It: Options for all skill levels, durable enough for regular outdoor use.
-
Pro Tip: The intermediate model (28″ x 52″, 3/16″ thick) is a sweet spot for most players.
🌀 3. Extreme Roll-Up Shooting Pad (4′ x 8.5′)
-
Price: ~€123.67 (varies by market)
-
Features: Large surface area, rolls up for storage, UV-resistant.
-
Why It Works: Great for expansive drills and players who don’t have a fixed training setup.
-
Ideal For: Those with space to stretch out — and who want portability without losing surface quality.
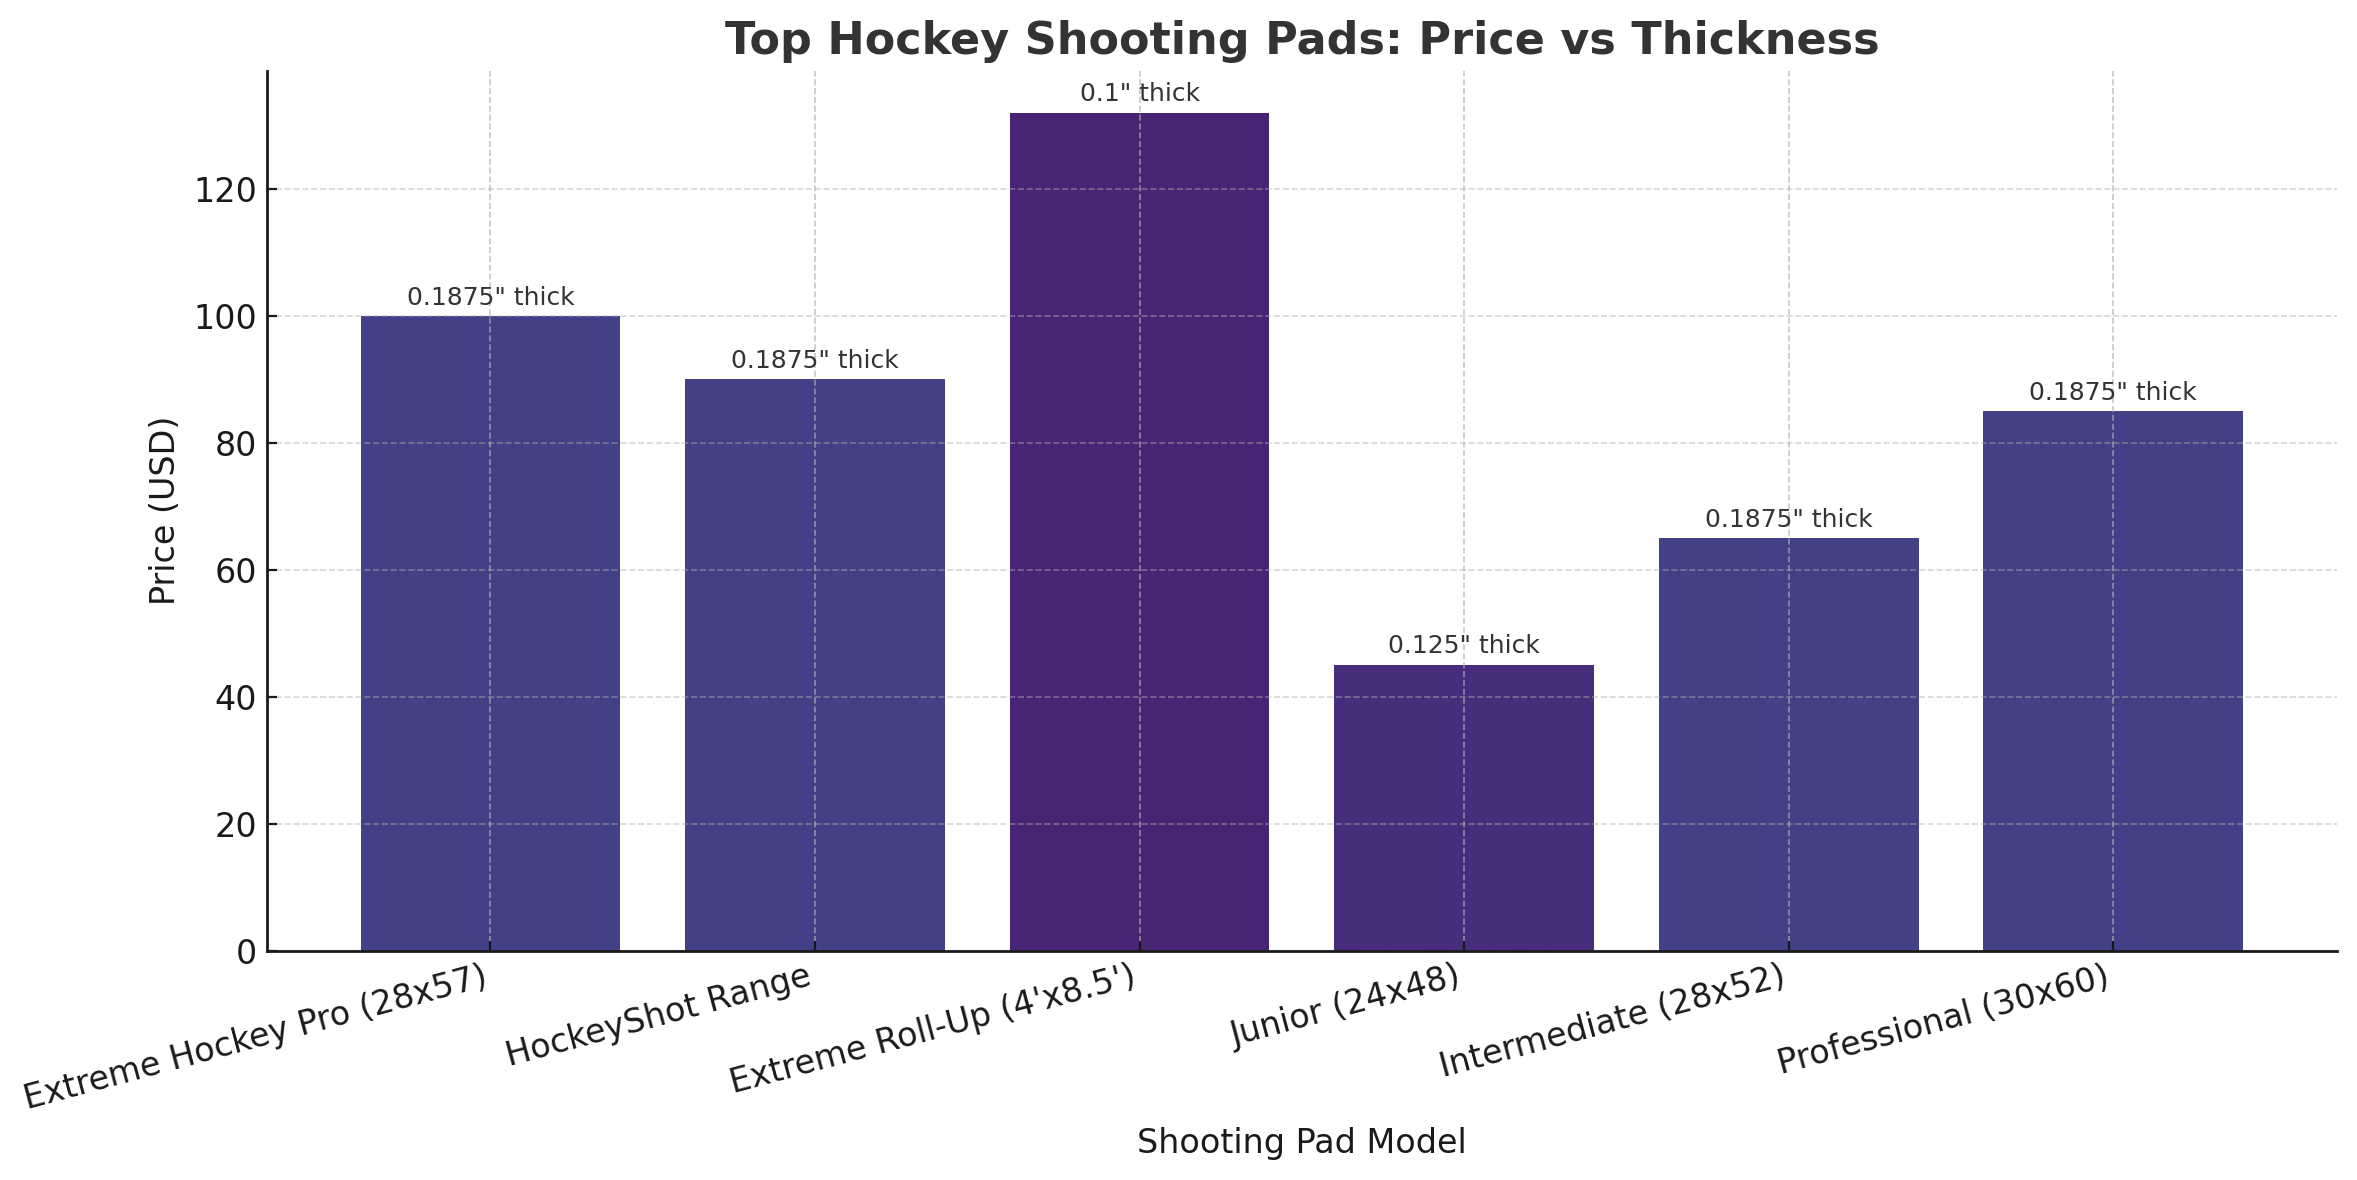
Here’s a clear, visually enhanced comparison chart showing some of the top hockey shooting pads based on price and thickness. This visual helps highlight:
-
How different models cater to varying skill levels and budgets.
-
How thickness correlates with durability and shooting experience.
Setting Up and Using a Hockey Shooting Pad
Setting up your hockey shooting pad is like prepping the ice before puck drop—it’s all about creating the right conditions to perform. Whether you’re in a garage, basement, or backyard, getting your environment right makes a huge difference in how realistic your off-ice shooting practice feels.
| Step | Action | Pro Tip |
|---|---|---|
| 1. Find a Flat Surface | Choose a smooth, hard surface like a garage floor, cement patio, or driveway. | Avoid placing pads on uneven tiles or grassy areas—they warp over time. |
| 2. Position the Pad | Unroll or lay down the pad on your chosen space. | For portable pads, align them lengthwise to give more space for stickhandling. |
| 3. Secure the Corners (Optional) | Use double-sided tape or anti-slip pads to prevent shifting during drills. | This is especially useful for slap shots or fast hands drills. |
👉 Pro Tip: Apply a quick coat of silicone spray or Pledge to reduce puck friction—this mimics the low-friction glide of real ice and protects your stick blade. Some Reddit users even swear by a touch of WD-40 on both puck and pad for smoother play.
Shots to Practice on a Shooting Pad
Whether you’re a beginner working on mechanics or a skilled shooter fine-tuning your release, a hockey shooting mat offers the ideal platform to train different types of shots. Start with these three foundational shots:
1. Wrist Shots
-
Setup: Position the puck behind your back foot.
-
Execution: Transfer weight to your front foot while using your bottom hand to generate power and top hand for control.
-
Focus: Smooth release, full follow-through, and target accuracy.
2. Slap Shots
-
Setup: Place the puck slightly ahead of your front foot.
-
Execution: Wind up while shifting weight to your back foot, then snap forward and down through the puck.
-
Focus: Power transfer and timing—don’t rush the swing.
3. Snap Shots
-
Setup: Similar to a wrist shot, with the puck behind your back foot.
-
Execution: Use a quick wrist snap with minimal windup.
-
Focus: Fast release and precise follow-through.
🧠 Bonus: Add a clamp-on passer or a shooting target tarp to simulate dynamic training scenarios and rebound control—perfect for solo sessions.
Common Mistakes to Avoid
Even the best shooters develop bad habits without noticing. Here are some common errors to look out for—and how to fix them:
| Mistake | What It Looks Like | Fix |
|---|---|---|
| Poor Body Positioning | Twisted shoulders, off-balance stance. | Keep hips and shoulders square to the target. |
| Ineffective Weight Transfer | No leg drive—shots feel weak. | Focus on moving weight from your back foot to your front foot. |
| Minimal Follow-Through | Stick stops short, puck loses accuracy. | Extend your stick toward the target every time. |
🧊 Want to replicate real-time pressure? Practice timed drills using a shot timer app or set a shot count goal (e.g., 100 wrist shots in 10 minutes). Repetition under pressure builds muscle memory fast.
Common Questions On Hockey Shooting Pad
How do you practice hockey shooting at home?
You can effectively practice hockey shooting at home with a hockey shooting pad and a flat surface like a driveway or garage. Here’s a simple drill routine:
-
Warm-up – Light stickhandling to get your hands and wrists moving.
-
Wrist shots – Start behind the back foot, transfer weight forward.
-
Slap shots – Begin with the puck just ahead of the front foot. Use a full wind-up for power.
-
Snap shots – Quick flick of the wrists for release speed.
-
Cool down – End with freestyle puck control or precision drills.
Many players recommend adding a backstop net to avoid chasing pucks and using weighted pucks for developing forearm strength and faster releases.
What are hockey shooting pads made of?
Most high-quality shooting pads are made from high-density polyethylene (HDPE) — a UV-resistant, low-friction plastic. It simulates the slickness of real ice, allowing smooth puck glide and protecting stick blades from wear.
Some premium models now feature silicone-infused coatings for added glide and durability. DIY enthusiasts often replicate this by applying WD-40 or silicone spray to HDPE sheets from hardware stores.
Are hockey shooting pads worth it?
Absolutely. A good shooting pad mimics ice closely, helping you develop your shooting and stickhandling skills off the rink. Whether you’re a beginner or a competitive player, the consistent, slick surface allows:
-
Improved shooting mechanics
-
Better puck control
-
Longer stick lifespan (prevents concrete damage)
-
More frequent reps (train year-round, anywhere)
Which puck should I use on a shooting pad?
-
🟢 Standard rubber pucks work well but may wear over time.
-
⚫ Weighted pucks (6–10 oz) help build strength and shot velocity.
-
✨ For best glide, some players apply WD-40, Pledge, or silicone spray to both the puck and pad.
Avoid using dirty pucks—they can scratch or gum up the pad surface over time.
How can I reduce friction on a hockey shooting pad?
Reddit players share some tried-and-tested tips:
-
Clean the pad before every use.
-
Spray silicone lubricant or WD-40 lightly on the surface.
-
Store the pad flat (especially roll-up models) to avoid warping.
-
Use a passer or rebounder to maintain smooth drills without interruption.
Should You Choose a Shooting Pad or Synthetic Ice Tiles?
If you’re trying to decide between a hockey shooting pad and synthetic ice tiles, it really comes down to how you train.
Shooting pads are ideal for quick setup and focused shooting or stickhandling drills. They’re easy to move, affordable, and great for practicing mechanics like wrist shots or snap shots. On the other hand, synthetic ice tiles offer a more immersive training experience. With their broader surface area, they’re better suited for footwork, agility drills, and full stickhandling practice.
Many players actually combine both in their off-ice setups — using the shooting pad for direct shot practice and tiles for skating simulation or extended puck control.
Are DIY Shooting Pads a Smart Move?
If you’re on a budget or love building your own gear, DIY shooting pads can absolutely work.
A common approach is to use HDPE sheets from hardware stores. When paired with a silicone-based lubricant, they offer a surprisingly smooth glide. These setups are affordable and customizable, but don’t always hold up to intense, long-term use like commercial pads do.
Still, for casual practice or beginners, they’re a great way to get started without a big investment. Just be prepared to reapply lubricant and replace materials more often.
Final Thoughts
Shooting pads aren’t just gear—they’re training environments. They’re where slap shots are perfected, snap releases are sharpened, and confidence is built long before you lace up for a game.
So, what are you waiting for? Start building your own off-ice shooting station, track your progress, and evolve your game.
Whether you’re diving into off-ice stickhandling, learning about regulation hockey goal sizes, or optimizing your hockey nutrition plan, remember: every rep, every drill, every shot on that slick sheet of synthetic ice is an investment in your future performance.
Explore the various types of hockey helmets or delve deeper into the world of ice hockey nutrition.Whatever aspect of hockey you’re interested in, remember, every stride you take on the ice, every shot you make, every save, and every goal is a celebration of the indomitable human spirit.
Explore more about the world of hockey gear and equipment with these informative articles: Hockey Stick Brands and Hockey Skate Brands.
References:
- Hockey Shooting Pad Youtube Tutorial
- Baker, J., Cote, J., & Abernethy, B. (2003). Learning from the experts: Practice activities of expert decision makers in sport. Research Quarterly for Exercise and Sport, 74(3), 342–347. Link

My name is Shane and I am a semi-pro hockey player who enjoys playing hockey more than anything else.I test and rate hockey Gear so that you can find the best gear that helps you play better.
